Kompleksowy przewodnik dotyczący planowania wizyty paszportowej: w przypadku nowych wniosków i odnawiania
W miarę jak kraj powoli powraca do stanu sprzed pandemii, ludzie są teraz nastawieni na latanie do i z kraju. Ale jeśli planujesz podróżować lub pracować za granicą, jedną z rzeczy, bez których nie możesz wyjechać (poza pieniędzmi), jest paszport.
We understand how rigorous and painstaking the passport appointment process can be. So to make things easier for you, we have come up with a comprehensive step-by-step guide to help you with your passport application.
Preparing the Requirements
It’s only natural to forget a handful of things, but it would be a disaster to have your passport application the next day only to realize that you don’t have an original copy of your birth certificate. Make sure you have the following requirements needed when applying for a passport.
- Original copy of PSA birth certificate on security paper
- Valid ID (original and photocopy)
- Accomplished application form
- Confirmed DFA passport appointment
- Personal appearance
Step-by-Step Process of DFA Passport Application
Step #1: Online Passport Appointment
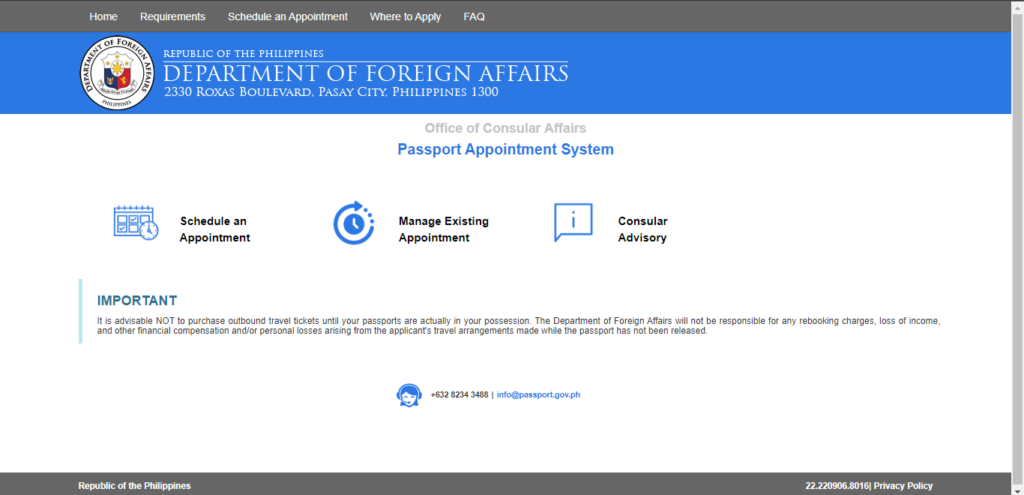
Przetwórz swój wniosek online, przechodząc do witryny DFA Passport Appointment System i klikając “Schedule an Appointment”.
To manage and control foot traffic, the Department of Foreign Affairs (DFA) listed temporary off-site facilities has suspended walk-in and courtesy lane services until further notice. The Temporary Off-site Passport Service (TOPS) facilities are:
- SM Aura
- SM North EDSA
- SM Mall of Asia
- Robinsons Las Piñas
- Robinsons Magnolia
- Uptown Mall
- SM Downtown Olongapo
- Robinsons Galleria South (San Pedro)
- SM Seaside
- SM Lanang Premier Davao
- Robinsons Novaliches
- SM City Sucat
- SM Manila
- Robinsons Lipa
- Robinsons Starmills
- Robinsons Angeles
- Robinsons Malolos
- Robinsons Iloilo
- Robinsons Bacolod
- SM Downtown Premier (Cagayan De Oro)
List of Temporary Off-Site Passport Services is taken from https://dfa-oca.ph/transparency-seal/directory-of-temporary-off-site-passport-service-tops/?fbclid=IwAR1aVfgNzuNUdv0ErLE9ROGHmx1BHiy6x_HHT60TZOkSB9xpdsUffn2-NOU
Step #2: Terms and Conditions
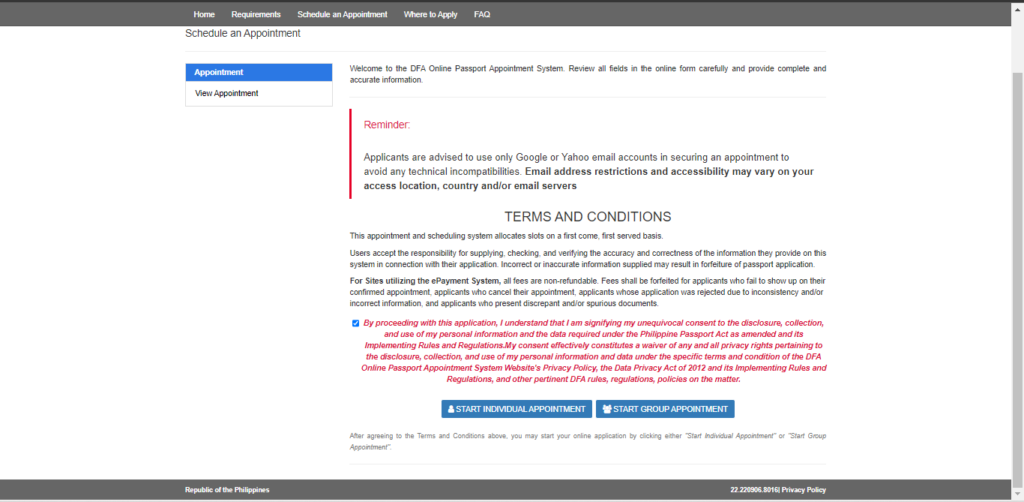
Upon clicking, you will be redirected to the Terms and Conditions page. After reading, tick the checkbox right beside “By proceeding with this application…”, then click on “Start Individual Appointment.”
If two or more family members are applying, click on “Start Group Appointment”.
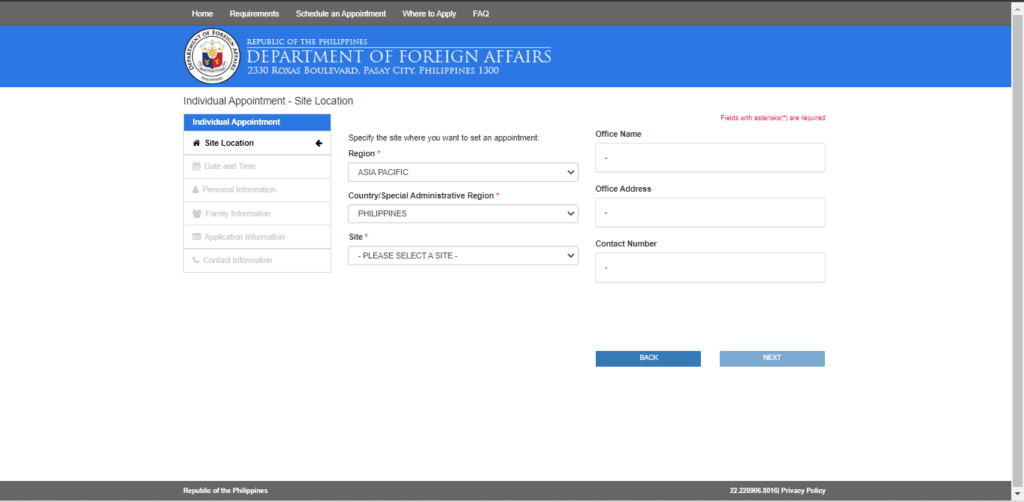
Step #3: Choosing Your Site Location
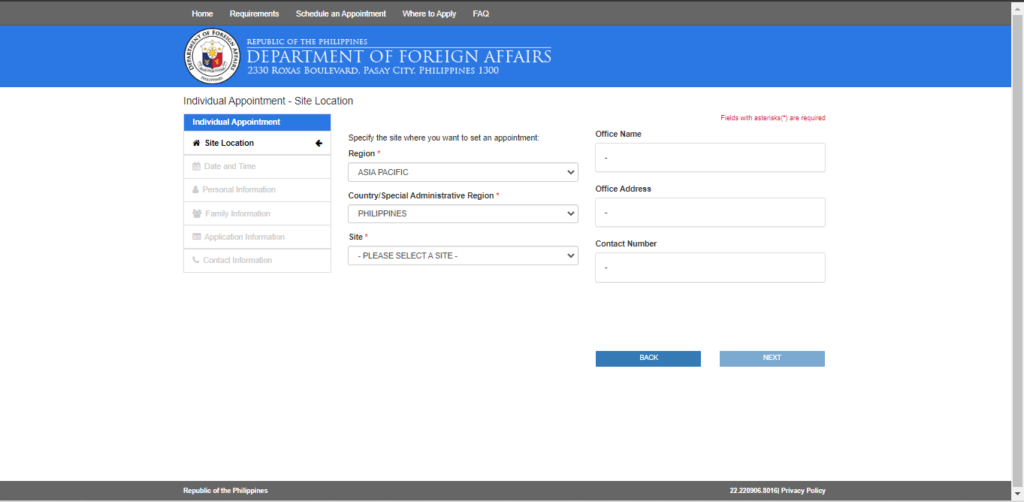
Select the site where you want to set your passport appointment.
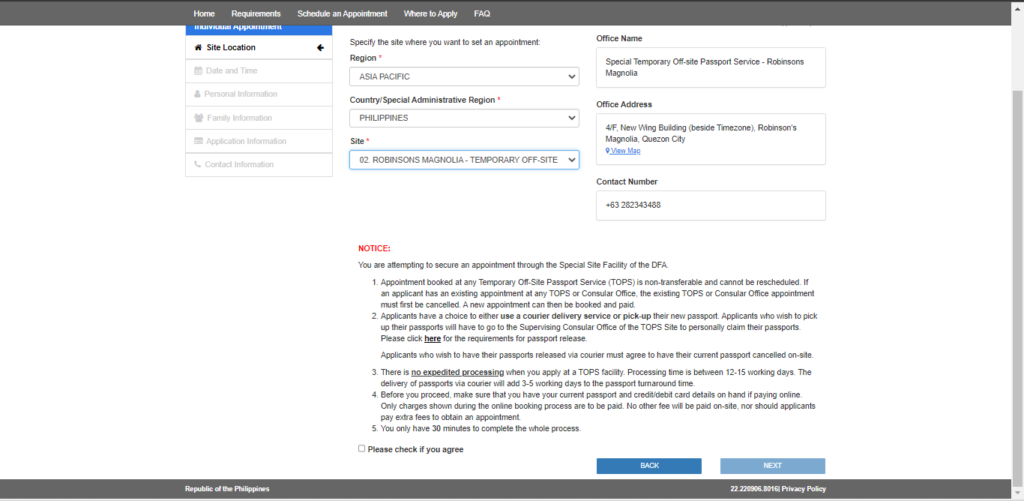
Once you have chosen your location, read carefully the “Notice” before checking the box next to “Please check if you agree”. Then, click “NEXT” to proceed to the next step.
Step #4: Picking the Date and Time of your Appointment
To select the date and time you wish to make your passport appointment, click on a date you want (dates and times highlighted in green indicate available slots), before clicking on your desired time on the right-hand portion of the screen.
Solve the captcha code, then click “NEXT“
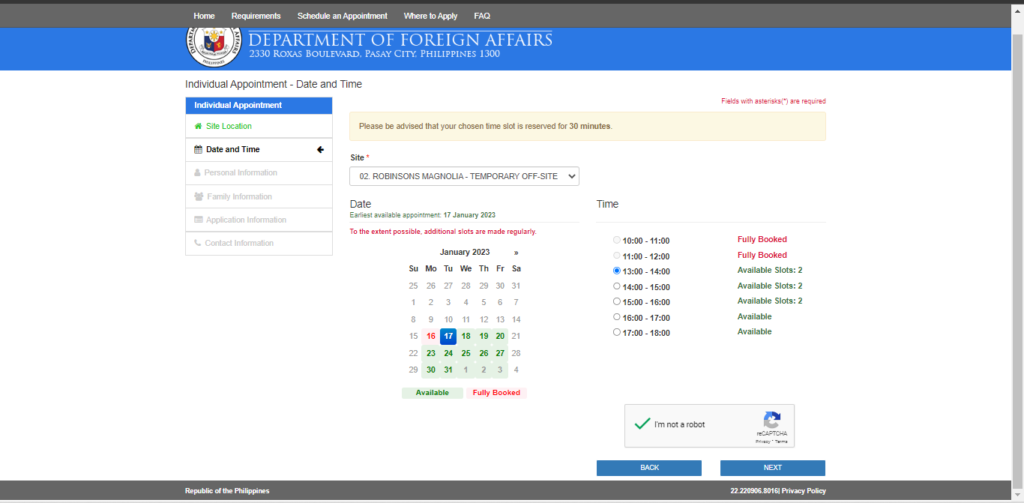
Remember that you only have 30 minutes to complete this step, and make sure to complete all fields as asked. Inactivity will result in redirection to the start (Schedule an Appointment) of the page.
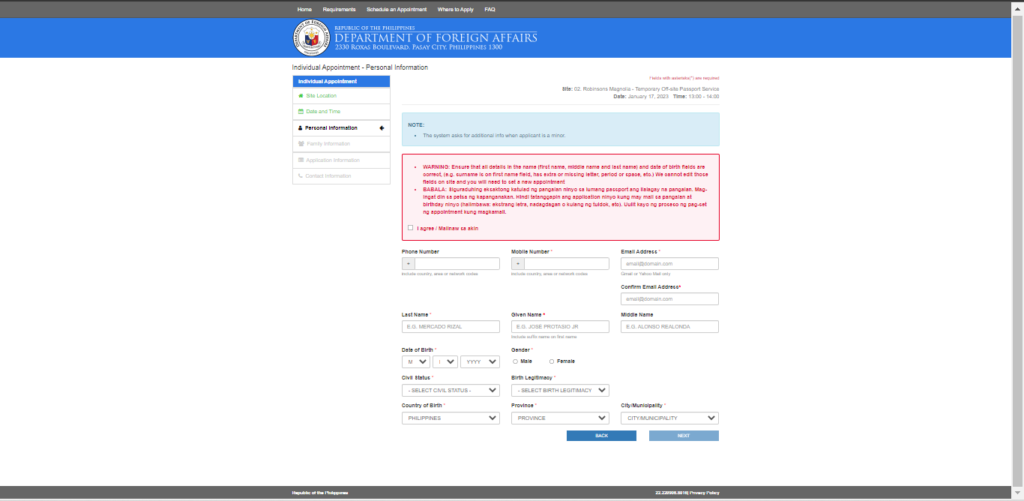
Step #5: Enter Your Personal Information
Fill out the form with your personal information. Provide all the required data such as your full name, date of birth, gender, civil status, birthplace, birth legitimacy, contact number/s, and email address.
Step #6: Enter Your Family Information
Similarly, supply all required information as asked. This time, of your father, mother, and spouse (if applicable).
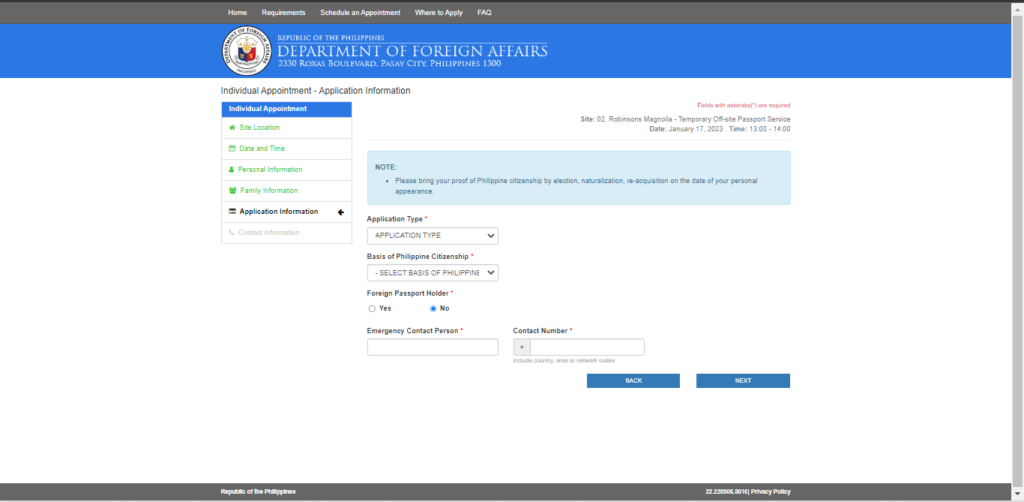
Step #7: Application Information
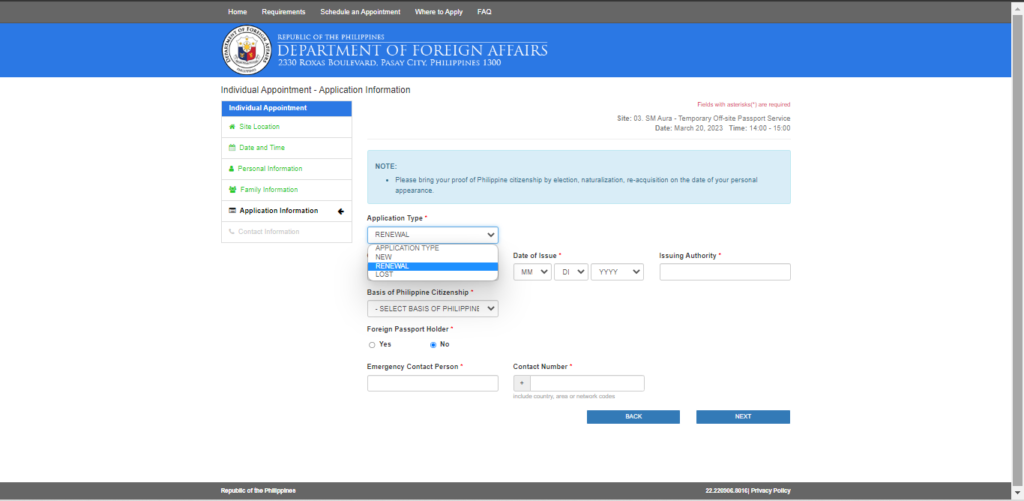
For applicants who have not been issued Philippine passports before this application, select New under application type.
For the Basis of Philippine Citizenship, select Birth if you are a natural-born Filipino.
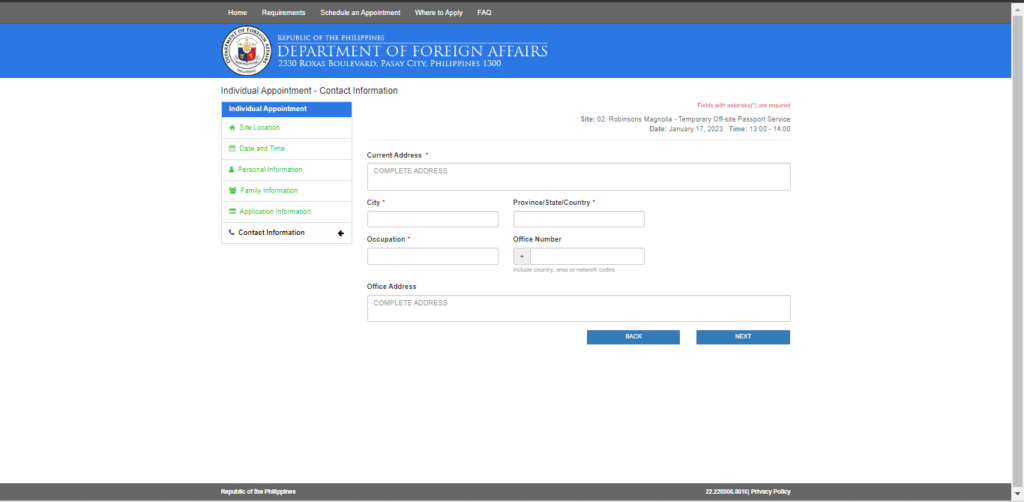
Step #8: Informacje kontaktowe
Fill out the fields with your contact information. This includes your complete address, city, and province.
Step #9: Review Information
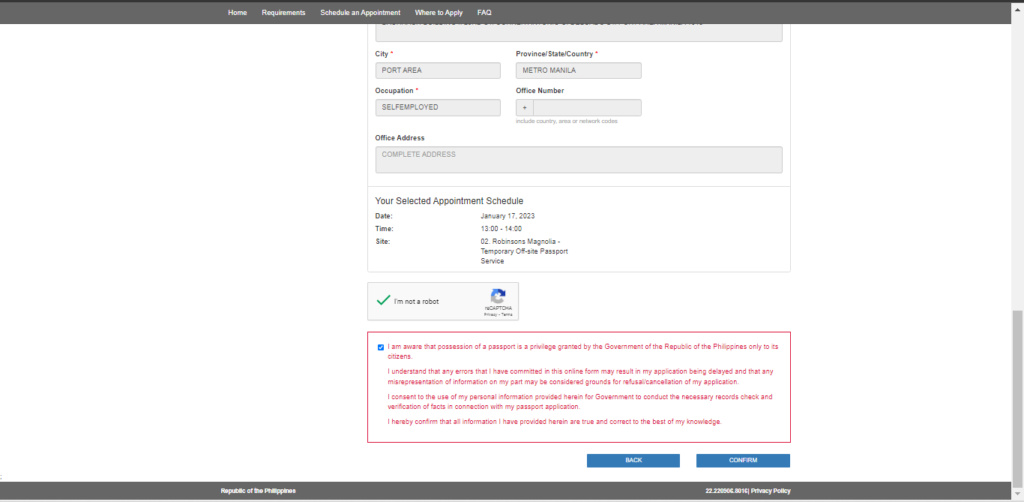
We’re almost done! Once you’ve input all your personal data, review your passport application. In case you want to make any changes, you can just click on the “BACK” button. If you find that all information are correct, solve the captcha then click “Confirm”.
Step #10: Payment
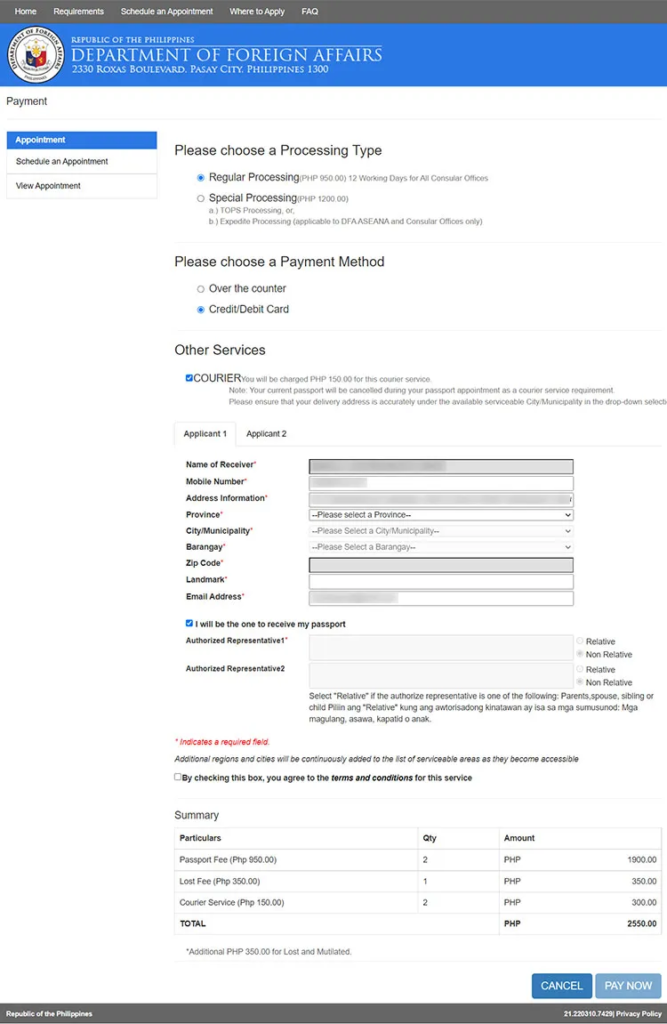
After submitting the form, you’ll need to pay for the processing fee. If you’re wondering how much a passport appointment costs, you have two options depending on what applies to you:
Regular Processing – Costs P950 and takes 10-15 days in Manila.
Express Processing – Costs P1200 and takes 5-7 days in Manila.
In case you have any commitments on the day of your passport issuance, you can choose to have your passport delivered to your address by checking “Courier”. Shipping costs fall at PHP 150.00. Just enter your delivery address and select the courier. You’re good to go!
Step #11: Personal Appearance
This is the day you are waiting for. Be on time and bring all the requirements with you, your application form in printed copy, the checklist with your confirmed schedule, and your e-receipt in two copies.
You will undergo the following processes inside the DFA office:
- Document verification
- Processing
- Data Encoding and Biometrics
- Delivery
Step #12: Passport Claiming
If you did not avail the delivery service option, you’ll need to pick-up your passport on the indicated release date. Make sure to bring your application receipt and claim stub.
In case you can’t claim your passport, an immediate family member can claim your passport on your behalf as long as he/ she has an authorization letter prepared and signed by you with other requirements. They must bring the following:
- Authorization Letter
- Original Receipt
- Applicant’s Valid ID (original and photocopy)
- Representative’s Valid ID (original and photocopy)
If you have no immediate family member available to claim your passport, your authorized person must bring the following:
- A Special Power of Attorney
- Original Receipt
- Applicant’s Valid ID (original and photocopy)
- Representative’s Valid ID (original and photocopy)
How to Renew Passport Online
People tend to forget a lot of things, and passport expiration dates are no exception. Don’t worry, renewing your passport is easier than applying for your first one. Here are easy steps on how to renew your passport online.
Step #1:
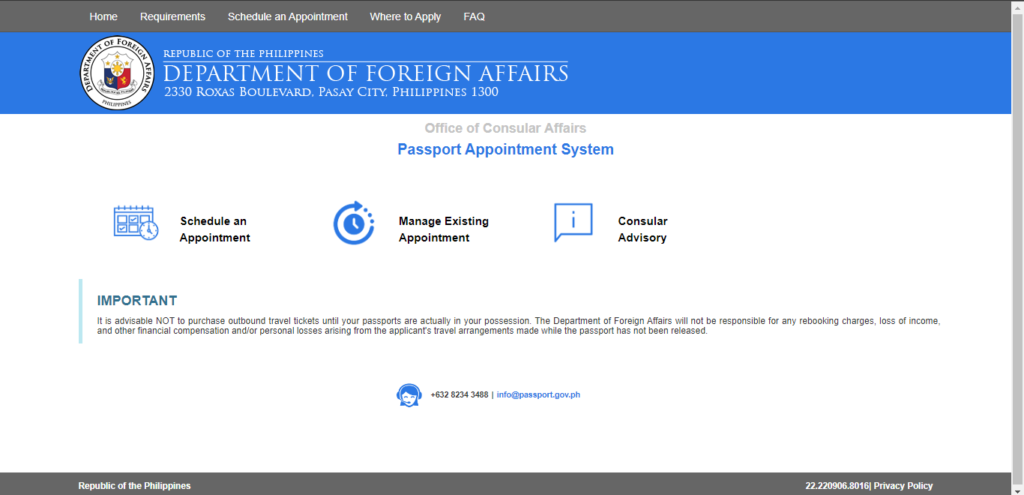
Podobnie jak w przypadku ubiegania się o paszport, można przetworzyć wniosek online, przechodząc do witryny DFA Passport Appointment System i klikając “Schedule an Appointment”.
Step #2:
Similar to applying for a passport, fill out the necessary fields with your personal information
Step #3:
This time. instead of selecting New, Click on Renewal.
Step #4:
After completing the form with all the necessary details, you now have to settle the processing fee.
Depending on what applies to you, you can choose either of the processing options:
Regular: PHP 950 and takes 10-15 days processing
Express: PHP 1,200 and takes 5-7 days processing
**additional convenience fee may apply per applicant
Step #5:
Once you’ve completed the payment, check your email. You will be sent a payment reference number together with your application form, passport renewal checklist, as well as your transaction receipt. Don’t forget to print a hardcopy on A4 paper and present them on the day of your appointment.
Step #6:
Show up on the date of your renewal. Make sure to be at your DFA branch at least 15 minutes before your appointment.
Great! Now, did you apply for a passport to explore an opportunity abroad? We welcome applicants looking for a job opportunity in other countries.



Great content! Keep up the good work!
Bloguję dość często i naprawdę doceniam
treści. Ten świetny artykuł naprawdę wzbudził moje zainteresowanie.
Mam zamiar zanotować twój blog i zachować
Sprawdzam nowe szczegóły mniej więcej raz w tygodniu. Zapisałem się również do kanału RSS.